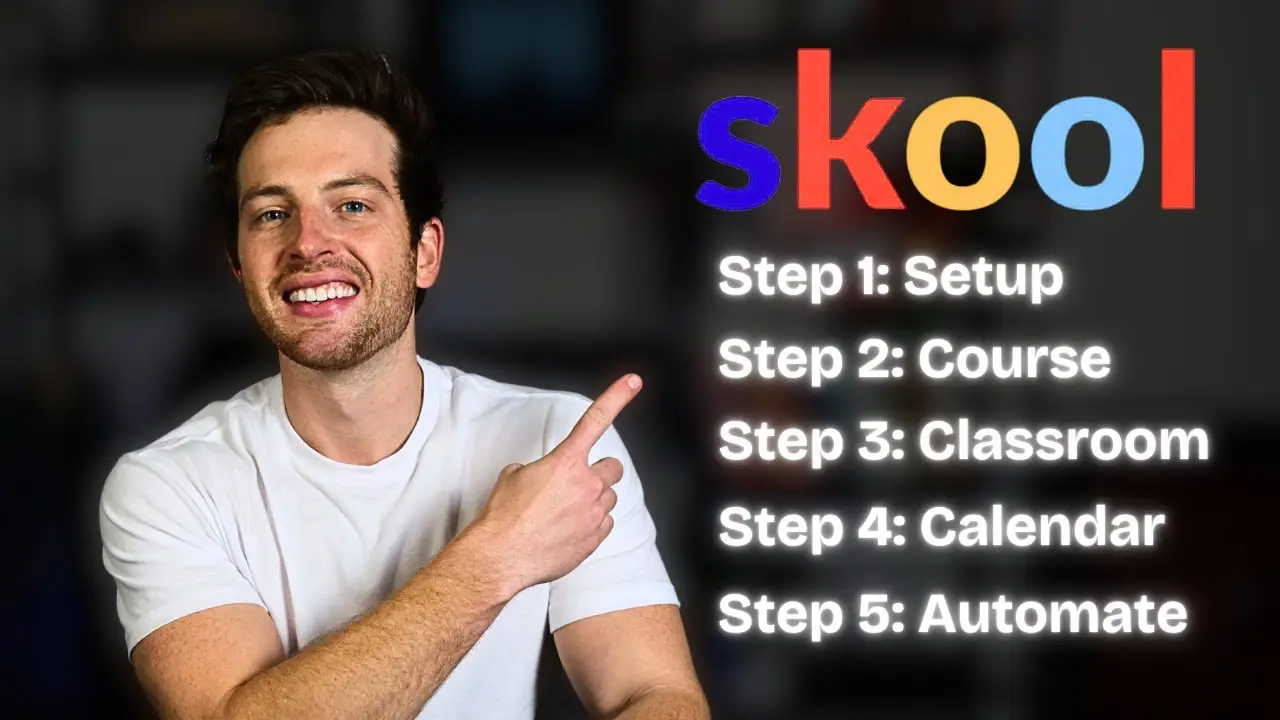
Complete Skool Community Setup Guide (+ $500K Sales Framework)
In this comprehensive guide, I’m going to walk you through the exact process my team and I use to set up Skool communities from scratch—the same system that’s helped our clients generate around half a million dollars in sales over the last year. Whether you’re building a free lead generation community or launching a paid membership, you’ll get the complete checklist I personally follow when creating these communities.
This tutorial covers everything from technical setup to conversion optimization, giving you a replicable framework you can implement immediately.
I recorded this walkthrough to show you step-by-step how to build your first few hundred members, and then you can potentially work with us to scale even further.
Starting Your Free Trial and Initial Setup
The first step is starting your 14-day free trial on Skool. You can use my affiliate link or simply search for the platform on Google. During setup, you’ll name your group based on whatever topic or subject you’re building around, enter your payment information, and hit start. Once you’re in, you’ll see your new group dashboard where all the magic happens.
In my video, I explain that the settings and general section is where you’ll customize your community’s appearance. This includes uploading your icon and cover photos, writing your group description, setting your group initials and color, and choosing between private or public visibility. I personally use Canva to create professional-looking logos and cover images—you can find countless logo mockups there that you can customize in minutes.
Public vs. Private: A Critical Decision
One of the most important early decisions is whether to make your community public or private. With a private group, people must join before seeing any content, discussions, or calendar events. A public group, however, allows anyone to view content without joining—they just can’t actively participate or comment.
I recommend considering public mode if you want to generate organic leads through Skool SEO. In my experience, public Skool groups can actually rank on Google for relevant searches. I show an example in the video where typing “how to leverage school with AI” brings up a Skool group at the top of the results. As Skool continues growing, this SEO opportunity will only get bigger.
Crafting Your Group Description
Your group description needs to immediately communicate value. I use a simple formula: who it’s for, what it does, and how it benefits them. For my “One to Many Secrets” community, I wrote: “Helping coaches, creators, and community builders leverage one-to-many sales to scale their businesses without hiring a sales team or looking like a hype man.”
Notice how I address the main objection in my market—people don’t want to appear overly salesy or lose trust with their audience. Your description should speak directly to your target member’s desires and fears, making it crystal clear why they should join.
Setting Up Discussion Categories
Discussion categories organize your community conversations into manageable tabs. I recommend starting with these essential categories: General, Announcements, Wins, Questions, and Feedback. You set these up by going to Categories and Rules in your settings.
For Announcements, I suggest setting permissions so only admins and moderators can post, while anyone can view. The Wins category is particularly valuable—this is where you’ll gather testimonials and user-generated content that proves your community delivers results. You can also add niche-specific categories. For example, if you’re running an ads-focused group, you might add “Video Ad Feedback” so members can tag their content appropriately.
Membership Questions and Auto-DMs
Setting up membership questions is crucial, especially for free communities. I explain in my video that you access this through the Plugins section. The questions I always include are:
- What is your email? (Set response type to email address)
- What is your phone number? (I incentivize this by offering a free course)
- Where are you at with your business right now? (Multiple choice with revenue ranges)
That last question is a qualifying question that helps me understand each member’s situation. When someone joins, I immediately know if they’re doing $0-10K per month, $10-20K, or $50K+. This data is invaluable for personalization and sales conversations.
The Auto-DM feature, also found in Plugins, sends an automated welcome message to new members. I use this to direct people to either a free video, a welcome course, or a “Start Here” section. You can personalize these messages using naming mechanisms like hashtag-name or hashtag-group-name.
Configuring Advanced Plugins
Beyond membership questions and auto-DMs, Skool offers several other powerful plugins. The “Unlock Chat at Level 2 or 3” feature reduces spam by requiring members to reach a certain engagement level before they can send direct messages. This is particularly useful for large groups.
You can also add your Meta pixel for tracking if you’re running Facebook or Instagram ads to your about page. I’ve implemented this on some of my groups for more advanced tracking. The instant membership approval toggle auto-approves join requests, but I personally leave this off because I want to manually verify that each new member has a profile picture, proper name, and isn’t a spammer.
Adding Important Links
In the Links section of your settings, you can add URLs that appear directly under your group description. I typically include a “Book Your Free Strategy Call” link that goes to my VSSL page or booking calendar. This makes it easy for warm leads to take the next step toward working with me more closely.
Another great link to add is your Skool affiliate link. The Skool affiliate program pays you $40 per month for every group that joins under your referral. Simply label it “Start Your Free School Group” and paste your affiliate URL. This creates a passive income stream while also helping your members start their own communities.
Gamification Through Leaderboards
One of Skool‘s most powerful features is the leaderboard system. Members earn points through engagement, and you can unlock different resources, courses, or even calls at specific levels. I explain in the video how you can get creative with level unlocks—maybe a bonus course at level 2, a 30-minute strategy call at level 5, or even an in-person meetup at level 10.
You can customize the leaderboard level names to align with your community’s theme. In my example, I used ChatGPT to generate level names for my “One to Many Secrets” group, coming up with titles like Changemaker (Level 10), Master (Level 9), and Leader (Level 8). This makes the gamification feel more intentional and branded to your specific community.
Building Your “Start Here” Course
Every Skool community needs an onboarding course that I call “Start Here” or “Onboarding.” This course should include several key modules:
- Welcome to the Group – A basic introduction
- Why This Is Different – What makes your community unique
- What’s In It For Them – Clear benefits they’ll receive
- Why You’re Different – How you stand out from competitors
I emphasize in my video that everyone is motivated by what’s in it for them. Your community isn’t about you—it’s about how it serves your members. Make this abundantly clear from the very beginning. Address their objections, articulate your unique positioning, and show them the transformation they’ll experience.
Creating Courses and Content
When building out courses in the Classroom section, you can organize content using folders and modules. For instance, if I’m creating an “Offer Secrets” course, I might have Phase 1 as a folder called “Creating Your Offer” with modules like Refining Your Avatar, Offer Delivery, and Offer Nirvana. Phase 2 might be “The Pitch” with modules on storytelling and selling.
You can set courses to be open to everyone, locked behind level requirements, unlocked after a certain time period, or completely private. I recommend using level 2 unlocks for bonus courses—this incentivizes engagement since the most active members are often your warmest leads and future customers.
The Skool editor makes it easy to add text, images, videos, and resources. I share a hack in my video for adding Google Docs as resources: when you share the document, change the end of the URL from “edit” to “copy” so members automatically make their own copy instead of editing yours.
Setting Up Your Calendar and Events
The Calendar tab is where you’ll schedule Q&A calls, workshops, and other live events. I recommend starting with a weekly Q&A session if you’re running a free community—something like every Tuesday at 5 PM for 90 minutes.
For lead generation, I explain that hosting free workshops within your free community is extremely effective. This is exactly what we’ve done with our clients to generate those half-million dollars in sales. You can set events to recur, add Zoom or Google Meet links, and even restrict attendance to members at certain leaderboard levels or enrolled in specific courses.
One powerful strategy I share is syncing your Skool calendar with Google Calendar. Create a new Google Calendar, make it public, grab the shareable link, and add it as a resource in your Start Here course. When members add this to their personal Google Calendar, they get double reminders—one from Skool and one from Google—dramatically increasing show-up rates.
Crafting Your Welcome Post
Your pinned welcome post sets the tone for community participation. In mine, I immediately tell members what’s in it for them (free gifts), establish the rules (level 1 members may be removed), build credibility (our results with clients), and give clear action steps: introduce yourself, comment on others’ posts, follow me on Instagram, and read the full instructions.
I ask members to share who they are, where they’re from, why they joined, their hobbies, and a link to their best social media. This gives me valuable information about who might be a good fit to work with us. You can also create a roadmap post that outlines upcoming courses, calls, and features so members know what’s coming and stay engaged.
Setting Up Automations with Zapier
For more advanced community management, I use Zapier to automate data flow between Skool and other tools. In Settings > Plugins > Zapier Integrations, you can create an API key that connects to Zapier. I demonstrate how when someone joins my Community Accelerator group, I automatically:
- Capture their membership question answers
- Add them to a tag in Kit (formerly ConvertKit) that triggers a welcome email sequence
- Add them to a Google spreadsheet for tracking
- Create an opportunity in Go High Level CRM
This creates a seamless system for nurturing leads and tracking member data without manual work. The trigger event in Zapier is “answered membership questions,” which fires as soon as someone completes your intake form.
Optimizing Your About Page for Conversions
Your Skool About Page is essentially your sales page, and in my experience, it’s critical for conversions. I’ve tested dedicated sales pages versus Skool About Pages, and I believe traditional sales pages still convert better for audiences unfamiliar with Skool. However, if your audience already knows the platform, the native About Page works great.
Your About Page should include a clear headline that communicates the transformation, social proof with testimonials and revenue numbers, prominent calls-to-action, and digital mockups showing what’s inside. I recommend using Canva to create these mockups—they give prospects a visual preview of your courses and community.
Consider recording a Video Sales Letter (VSL) for your About Page. This significantly increases conversions by allowing prospects to hear your voice, understand your credibility, and connect with your story. You can monitor your conversion rate in the Dashboard section of Settings—aim for at least 25-30% for free communities.
Claiming Your Custom URL
Once you upgrade to a paid account (after your 14-day trial), you can claim a custom URL for your community. I explain in my video that you only get one chance to set this, so double-check your spelling before hitting confirm. For my group, I claimed “onetomanysecrets” as the URL, making it easy to share and remember.
Inviting Your First Members and Creating Engagement
After setup is complete, invite your first three members through direct outreach. Reach out to friends, warm audience members, or anyone who might benefit. Send them a personal message explaining why you’re excited about the community and how it will help them.
When someone joins, send them a personal DM in addition to your automated welcome message. I typically say something like: “Hey, the message above was automated, but I wanted to personally welcome you. What made you join the group?” This starts a genuine conversation where you can learn about their situation, offer help, and potentially guide them toward working together.
Remember that Skool communities are content-based businesses. You’ll need to consistently create community posts, update courses, and host live calls. The most engaged members—those commenting, participating, and leveling up—are typically your warmest leads and future customers. Pay attention to these people and document them as your “1,000 true fans.”