Canva Whiteboard Tutorial: Replace Miro & Save Money (2024 Guide)
If you’ve been looking for a way to use Canva as a complete collaboration hub and replace expensive tools like Miro, this guide will show you exactly how to use Canva’s whiteboard feature. I’ll walk you through creating collaborative whiteboards, adding sticky notes, and sharing them with your team—all without needing another subscription.
This is a direct response to a community member’s request in my Skool community, where I asked everyone to share their wishlist for Canva tutorials.
In my video, I show you the complete process of creating and collaborating with whiteboards in Canva.
Why I Created This Tutorial
In my Canva Obsessed community on Skool, I posted a question asking members to share their wishlist for Canva tutorials. I wanted to make sure I wasn’t wasting anyone’s time and that the community was genuinely useful for everyone. One member named Sasha made a specific request that caught my attention: she wanted to use Canva as an alternative to Miro so she could use Canva as a one-stop shop for everything.
This request aligned perfectly with another member’s wish to learn about new Canva features. I was excited to show everyone what Canva has set up because their whiteboard functionality is surprisingly robust. For those unfamiliar with Miro, it’s essentially a digital whiteboard where teams can collaborate on projects and leave sticky notes and other elements. I’ll be honest—I used Miro briefly and didn’t love it, but I’m not trying to criticize anyone who does. However, I find Canva’s whiteboard feature much more intuitive and accessible, especially for those already invested in the Canva ecosystem.
Finding the Whiteboard Feature in Canva
When you first log into Canva, you might see a whiteboard option right on your home screen. I explain in my video that I’m not entirely sure if what I see is algorithmic—meaning it might show you things based on what you use most or what you’ve looked at recently. If you don’t immediately see the whiteboard option on your homepage, there’s a simple workaround.
Simply type “whiteboard” into the search bar, but make sure the templates tab is selected at the top. Otherwise, you’ll only see your own designs, and if you haven’t created a whiteboard yet, nothing will appear. Once you search with the templates tab selected, you’ll see all kinds of cool different whiteboard ideas. I love Canva’s templates because they provide an excellent jumping-off point for any project, and the whiteboard templates are particularly well-designed.
Choosing and Customizing a Whiteboard Template
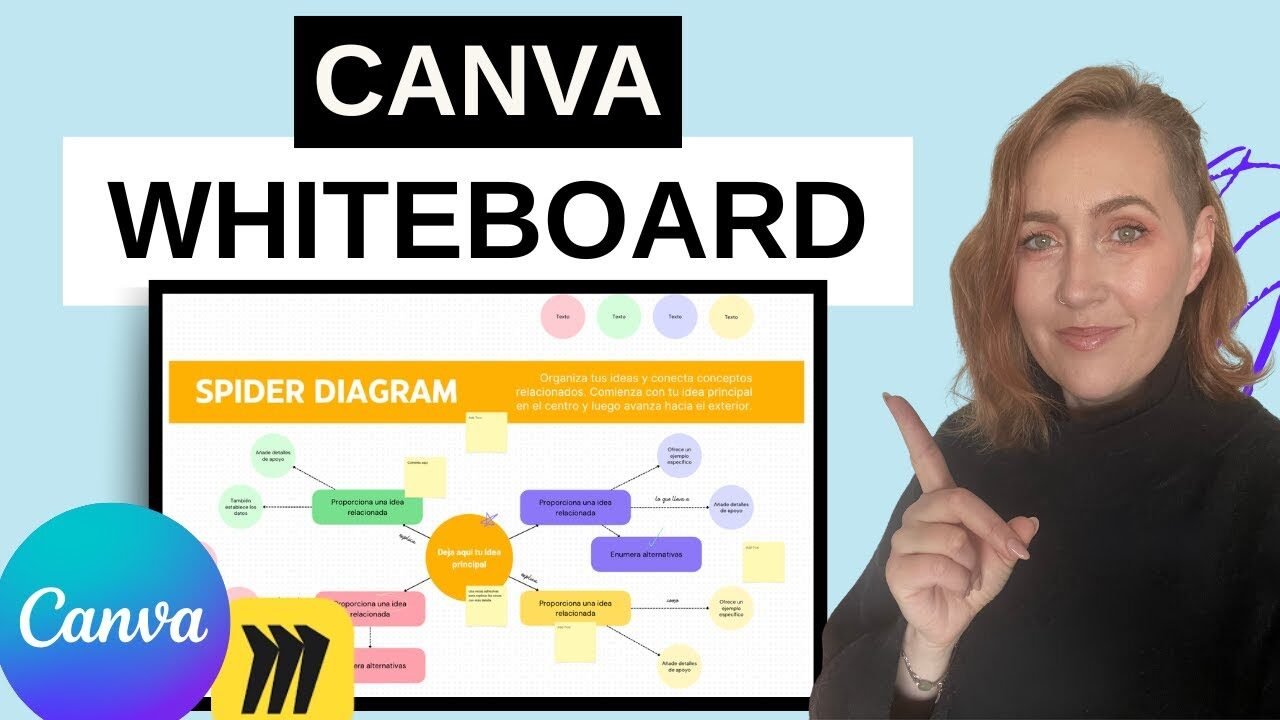
In my video, I browse through several whiteboard templates and decide to pick one with colorful sticky notes. I’m a bit obsessed with Post-it notes in real life, so naturally, I gravitated toward templates that feature them prominently. One thing I noticed while browsing was that some of my templates were appearing in Spanish—which is funny because while I do speak Spanish, I wasn’t expecting that. Regardless, I selected a vibrant template with Post-it note elements and clicked “customize this template.”
I do want to mention that you won’t be able to access many of these features if you don’t have Canva Pro. If you’re truly Canva obsessed, I recommend jumping in with both feet and getting the Pro version. You’ll be able to do so much more with Canva if you have Pro, and it will be worth it for your business. I’ve been a Pro member for years and haven’t regretted it once—I use Canva for absolutely everything in my business.
Working with Sticky Notes and Elements
Once you open a whiteboard template, you can move different elements around just like you would with any Canva template. What I particularly love is that when you zoom in, you have these little digital Post-its that function beautifully. For example, if your team is working on something collaboratively, you might want to leave a note like “I don’t love this idea. I’m not a huge fan. What if we did X instead?” You can then leave your initials at the bottom and place that note over whatever element you’re commenting on.
This is one of the key functions that Miro offers—the ability to leave contextual notes directly on a design or project board. The difference is that Canva’s implementation feels more intuitive to me, and the visual design of the sticky notes is more appealing. The templates I show in my video include sticky notes with subtle shadows that make them look like legitimate Post-its, which I find much more polished than simple colored squares.
Creating a Blank Whiteboard from Scratch
If you prefer to start from scratch rather than using a template, I demonstrate how to do that in my video as well. You simply go back to your home screen and look for the very first result that appears when you search for “whiteboard.” Many people miss this option because it’s grayed out and doesn’t have any design elements—it’s just a plus sign indicating you can create a blank whiteboard.
Once you click that blank option, you have a completely empty canvas where you can add whatever features you want. You can insert shapes that act like sticky notes by creating squares and changing their colors. I recommend making them lighter colors so that text remains readable. Adding text is straightforward, and you can easily change the typography to something simple and legible—the default options aren’t always the most readable.
One feature I love about starting blank is that if you change your mind, you can always add a template later. Simply go to the “Design” tab on the left sidebar, and you can pick any of the premade templates. When you do this, your existing elements remain in place, but the template appears alongside them. This is perfect because Canva whiteboards extend infinitely in all directions—above, below, left, and right—just like Miro’s infinite canvas.
How to Collaborate on Canva Whiteboards
Collaboration is where Canva whiteboards really shine, and I walk through the exact process in my video. The method I explain works not just for whiteboards but for any Canva design where you want multiple people working together. You start by clicking the “Share” button in the top right corner of your screen. From there, you click on “People with access” and type in the email addresses of anyone you want to invite.
When you invite someone this way, they become a collaborator, which means all of you will be working on the same file. This is perfect for whiteboard situations where you want a truly collaborative environment where everyone’s changes appear in real-time. However, I want to emphasize an important distinction that I make in my video.
The Difference Between Sharing and Template Links
If you’re designing anything other than a collaborative whiteboard and you don’t want someone else to change your original template, you shouldn’t use the sharing method I just described. When you share something as a collaborator, their changes will show up on your original design and will be visible to everyone who has access. This might not be what you want for client work or templates you’re distributing.
Instead, you want to create a template link, which is only available for Canva Pro users. After clicking the Share button, you look for the template link option at the bottom. If it doesn’t appear immediately, it’s likely because you’ve never used it before. In that case, click the three-dot menu and you’ll see “template link” as an option. You can also type “template link” in the search if you’re having trouble finding it.
Once you click on template link, Canva creates one for you instantly. You simply click the copy button and send that link to whoever needs it—your community, your team, individual clients, or anyone else. When someone uses a template link, they get their own copy of your design to work with, and their changes don’t affect your original or anyone else’s version.
Cost Savings and Practical Benefits
One of the reasons I was excited to create this tutorial is the potential cost savings for teams and solopreneurs. Miro is extremely expensive, especially for small teams or individuals. If you’re already paying for Canva Pro, adding whiteboard functionality doesn’t cost you anything extra. This makes Canva a genuinely compelling alternative for people who want collaborative whiteboard features without paying for an additional subscription.
I mention in my video that I don’t have a large team myself, so I probably won’t use the whiteboard feature very often in my current workflow. However, I can absolutely see myself using it in the future as my business grows. For people like Sasha who are actively looking for Miro alternatives, this could be a game-changer that saves hundreds of dollars per year while potentially offering a better user experience.
Resources from My Community
In my video, I also mention several other resources that are available in my Canva Obsessed community. For example, I already have a tutorial on how to build a pitch deck, along with a template available in the classroom section. I also have multiple videos on creating YouTube thumbnails, which is one of the most requested topics in my community. These tutorials don’t just cover the technical Canva aspects—I also include business tips and strategy since I run several businesses and have grown multiple YouTube channels.
One of my channels reached 1,600 followers with minimal effort, and another gained over 600 subscribers with only 14 videos before I made a strategic mistake. The point is that I bring real-world experience to these tutorials, not just software knowledge. At the end of my video, I promise to make the whiteboard template I created available as part of the module on creating whiteboards in Canva, so community members have a practical starting point.