YouTube to Blog Automation for $1-5 (Step-by-Step Guide)
In my latest video, I reveal how to build a complete automation system that converts YouTube videos into fully formatted WordPress blog posts for just $1-5 per post—a fraction of what most creators pay for similar services. This system uses Make.com and Claude AI to automatically extract transcripts, generate SEO-optimized content, and publish directly to your website with your own affiliate links included.
Most creators spend $50 monthly on services with limited customization options, but I wanted complete control over every aspect of the content generation process while keeping costs minimal.
In my video, I walk through the entire system step-by-step, showing you exactly how I built this automation and the critical mistakes you need to avoid.
How the YouTube to Blog Post System Works
The workflow I’ve created is surprisingly simple yet incredibly powerful. When I want to convert a YouTube video into a blog post, I simply paste the YouTube URL into my Airtable database and select “generate blog post” from a dropdown menu. From there, the automation takes over completely, requiring no additional input from me until it’s time to review the final product.
The Make.com automation first retrieves the YouTube thumbnail, description, and complete transcript using Appify’s scraping tools. This costs approximately half a cent to one cent per run, making it extremely economical even at scale. Once all the content is collected, it feeds this information into Anthropic’s Claude AI model, which I’ve found produces more natural-sounding writing compared to other AI tools.
Claude then generates the full blog post content, creates an SEO-optimized meta description, crafts an engaging title, and generates a clean URL slug for the website. The system then uploads the YouTube thumbnail as the featured image to WordPress and creates the complete blog post with proper HTML formatting, including H2 and H3 headings for better structure and SEO performance.
The entire process takes less than two minutes from start to finish. When I check my WordPress dashboard, the post is already there, fully formatted with my affiliate links embedded naturally throughout the content, ready for a final proofread before publishing.
The Three Critical Mistakes to Avoid
After building hundreds of AI automation systems for startups and small companies, I’ve identified three major pitfalls that most people encounter when creating these workflows. Understanding these mistakes will save you hours of frustration and dramatically improve your results right from the start.
Mistake #1: Not Providing Enough Context to the AI
The first and most common mistake is failing to give the AI sufficient context and instructions. If you simply feed a transcript into an AI model without proper guidance, you’ll get poorly written, generic content that sounds robotic and provides little value to readers. The AI needs to understand not just what content to work with, but how you want it structured, what tone to use, and what style elements to include.
In my system, I provide Claude with the complete transcript, the video description, description links, and detailed instructions about formatting, SEO optimization, and writing style. I even specify exactly how to handle affiliate links and where to embed the video within the post.
Mistake #2: Failing to Iterate on Your System Prompt
The second critical mistake is not refining your prompts over time. If you generate a poorly written article and simply hit regenerate expecting different results, that’s on you. You need to continuously iterate and improve your system prompts based on the output you receive.
Every time I encounter an issue with the generated content—whether it’s formatting problems, tone inconsistencies, or missing elements—I adjust my system prompt and save those improvements. These refinements compound over time, resulting in increasingly better output quality. I explain in my video that this iterative process is essential for creating a system that produces publication-ready content.
Mistake #3: Building Overly Complex Automations
The third mistake is creating unnecessarily complicated workflows. Many people think that more nodes and operations equal better results, but that’s simply not true. What matters is the final output and the time you save.
If you spend ten hours building a system that only saves you five hours, you’ve made a poor time investment. My approach focuses on simplicity and effectiveness. The automation I demonstrate uses just the essential modules needed to accomplish the task, nothing more. Less is truly more when it comes to automation systems.
Setting Up Your Airtable Database
I use Airtable for this system because it’s more powerful than Google Sheets while still offering a completely free plan. You can sign up using the link in my video description. The database structure I’ve created is intentionally minimal, containing only the fields necessary to track and manage blog post generation.
My Airtable includes these key columns: a unique auto number for tracking, the YouTube URL field as the primary input, a status field with three options (generate blog post, blog post generated, and blog post skipped), an optional additional resources field for supplementary research, and an affiliate links field where I can insert my monetization links. I also track the generated title, meta description, and WordPress post URL to maintain a complete record of all published content.
The status field is particularly important because it tells the Make.com automation which videos need processing. When I set a row to “generate blog post,” the automation knows to process it. Once complete, it automatically updates the status to “blog post generated” so the system doesn’t create duplicate posts.
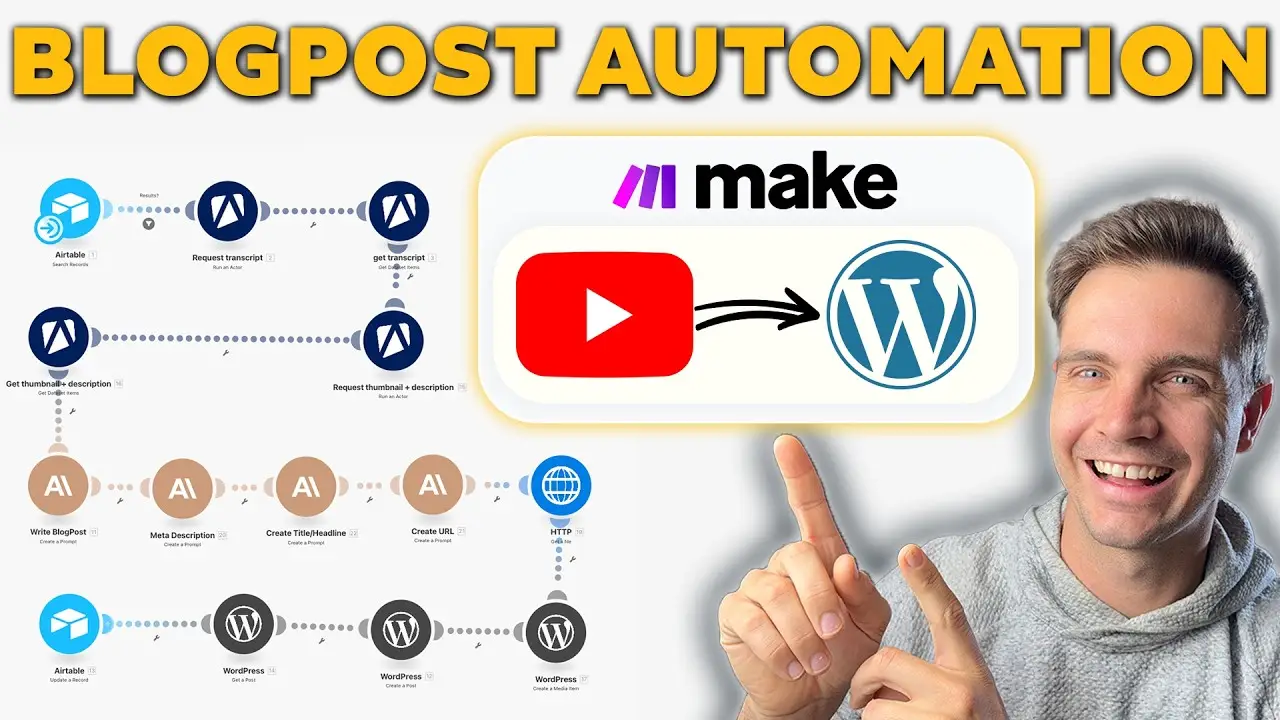
Building the Make.com Automation Workflow
Make.com operates on a simple trigger-and-action model. In my system, I use a “run once” trigger that checks the Airtable database for any rows marked with the “generate blog post” status. If you want to get started with Make.com, I provide a free plan link in my video description.
The first major step involves retrieving all necessary content from YouTube. I use Appify’s YouTube Transcript Ninja actor to extract the complete transcript, which forms the foundation of the blog post. Then I use Appify’s YouTube scraper to retrieve the thumbnail and video description. If you sign up through my Appify link, you’ll receive $5 in free credits, which is more than enough to process dozens of videos.
The beauty of using Appify is its incredibly low cost. I’ve been using it heavily and have barely spent $4 in an entire month, even with frequent usage. Each transcript request costs less than one cent, making it the most economical solution I’ve found for YouTube content extraction.
The System Prompt That Makes Everything Work
The most critical component of this entire system is the prompt I use with Claude AI. In my video, I show you the exact prompt I’ve refined over months of testing and iteration. This prompt is what transforms a raw transcript into a professional, SEO-optimized blog post that reads like it was written by a human.
I use Anthropic’s Claude Sonnet 3.7 model, which I’ve found produces superior writing quality compared to other AI models. To use this, you’ll need to sign up for the Anthropic developer console at console.anthropic.com and add some credits. I added $10 to my account and have barely used half of it despite heavy usage.
My system prompt contains several crucial elements. First, I specify the exact HTML format I want, which allows for seamless transfer to WordPress. I tell Claude exactly how to structure the content for SEO optimization, including proper use of H2 and H3 headings, paragraph length guidelines, and NLP-friendly formatting.
One particularly important instruction tells Claude to include any links from the video description naturally within the text using HTML anchor tags limited to one to five words. This ensures that links are integrated organically rather than feeling forced or promotional.
I also include specific instructions for embedding the YouTube video itself. The prompt tells Claude to include the original YouTube URL in a specific format that WordPress recognizes, which automatically creates an embedded player in the blog post. This is crucial because it keeps visitors on your site longer and improves engagement metrics.
Integrating Affiliate Links Automatically
One of the most powerful features of my system is the automatic integration of affiliate links. In the Airtable database, I have a dedicated field where I can paste any affiliate links I want included in the blog post. The system prompt contains conditional logic that tells Claude to naturally weave these links into the content wherever relevant.
The prompt instructs Claude: “If affiliate links are present in the Airtable, here are affiliate links to resources that I want to recommend or organically bring up in the article.” This approach ensures that affiliate links appear natural and contextual rather than spammy or forced. In my demonstration, I show how my 11 Labs affiliate link was seamlessly integrated into a blog post about AI dubbing tools.
Similarly, I have an “additional resources” field that works the same way. If I’ve done research or created supplementary materials while scripting the video, I can include those links in Airtable, and Claude will naturally reference them in the blog post as sources or recommended reading.
Optimizing Meta Descriptions and Titles
Beyond the main blog post content, my automation also generates optimized meta descriptions, titles, and URL slugs. I use separate Claude modules for each of these elements to ensure they’re crafted specifically for their purpose rather than being afterthoughts.
For the meta description, I use a dedicated prompt that requests a maximum of 135 characters to ensure it displays properly in Google search results. The crucial instruction here is to tell Claude to return only the meta description itself, without any preamble or explanation. This prevents errors when the content is inserted into WordPress.
The same approach applies to the title generation and URL slug creation. For the URL slug, I even provide Claude with example formatting so it knows exactly what structure I want. This attention to detail ensures that every element of the blog post is SEO-optimized and ready for publication without manual editing.
Publishing to WordPress Automatically
The final stage of the automation handles uploading everything to WordPress. First, the system makes an HTTP request to retrieve the YouTube thumbnail, then creates a media item in WordPress with that image. This becomes the featured image for the blog post, which is essential for social sharing and visual appeal.
The WordPress module then creates the actual blog post, pulling the title from the title generation module, the content from the main blog post generation, and the meta description from its dedicated module. I set the post type to “post” rather than “page” to ensure it appears in the blog feed. The URL slug is added from the slug generation module, creating a clean, SEO-friendly web address.
The featured media ID from the thumbnail upload is attached to the post, and finally, the system updates the Airtable record with the WordPress post URL and changes the status to “blog post generated.” This complete loop ensures that every step is tracked and nothing falls through the cracks.
Total System Cost and ROI
When you add up all the costs involved in running this automation, the total comes to approximately $1-5 per blog post depending on the length and complexity of the video. This includes the Appify scraping costs (less than 1 cent), the Claude API usage (typically 2-3 cents for a standard blog post), and the Make.com operations (which are included in the free plan for moderate usage).
Compare this to the $50 monthly subscriptions most creators pay for similar services, and the cost savings become immediately apparent. Even if you’re only converting one video per week, you’re saving hundreds of dollars annually. But more importantly, you have complete control over the output quality, formatting, and monetization strategy.
Getting Started with the Blueprint
While I show every single step of building this system in my video, I understand that some people prefer to skip the manual setup and get running immediately. That’s why I’ve created a ready-to-use blueprint package that you can download by commenting “BluePrint” on my video. This blueprint can be imported directly into Make.com and will have you up and running in 15-20 minutes after you insert your own API keys.
Whether you choose to build the system from scratch following my tutorial or use the pre-built blueprint, you’re now equipped with a powerful automation that transforms YouTube videos into an automated blog empire. This system generates content and potential income while you focus on what truly matters: creating new videos and developing fresh insights for your audience.